4-F About the Colour List...
 The colour list is an excellent tool. This is where you can store, sort, and
arrange the colours you want to keep. As mentioned before in the External
Source Tools section you can load saved lists from disk. But of course you
have to create and save your lists first.
The colour list is an excellent tool. This is where you can store, sort, and
arrange the colours you want to keep. As mentioned before in the External
Source Tools section you can load saved lists from disk. But of course you
have to create and save your lists first.
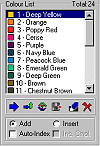
a) Adding To, or Creating The List.
When you have selected a colour you can add it to your colour list by
pressing the large blue arrow icon, located below the list box, that points
toward the right. This is the index icon. Clicking on it will send your
chosen colour to the list. You will notice that the name of the colour is
automatically the hexadecimal value of the colour. Each time you click this
icon another colour is sent to the list. Be careful, duplicate colours are
allowed. This is for web page designers who would like to name their colours
by their web page position, allowing more than one location to be mentioned but
contain the same colour.
b) Renaming Colours
You can change the colour's name to something much more readable by clicking
it once, and then pressing the icon that looks like two curved arrows surrounding
a "T". This is the "Change Title" icon and is located below the "Colour List
Box". This will bring up a dialogue box asking for the new colour name. Just
type in your user friendly colour name and press OK.
c) $$Adjusting Selected Colours
You can adjust the Hue, Saturation, and Vibrance of selected colours
from the "Colour List Box". Multiple colours can be selected using the CTRL or
SHIFT keys along with your left mouse button. Select the colours you want to adjust and right click the
"Colour List Box". Select "Adjust Selected Colour(s)" from the popup menu.
You will be presented with an HSV adjustment control. Please remember that when
a colour is at its maximum or minimum Saturation or Vibrance it can not be
adjusted higher or lower and will not appear to change. Select "Accept" to
accept the changes and make them permanent in your list. Select "Cancel/Close"
to close the dialogue without keeping any more changes.
d) Insert Modes
You can change the way that Quick Colour Picker sends colours to the colour
list. There are two method selections and two mode options. The methods are Add
and Insert. The "Add" adds new colours to the end of the list. The "Insert"
inserts colours in relation to the currently selected list colour. The Insert
method option also has a sub method. It is indicated by an icon which displays
two arrows at 90 degrees to each other. Clicking on this changes the icon's
appearance and the insertion function. When the arrow points up all sent
colours will be inserted above the currently selected colour. When the arrow
points down all sent colours will be inserted below the currently selected
colour. The "Auto-Index" mode causes all clicked colours to be sent to
the list immediately. The "Inc. Cmpl." mode includes the selected colour's
complimentary colours during the indexing process.
e) Moving/Sorting
Colours on the list can be arranged with the mouse just by clicking and
dragging the colour to its new position. The list can also be sorted
automatically by right clicking on the list and selecting the sort method from
the pop-up menu. Note that sorting by Hue, Saturation, or Intensity runs a
three pass sort.
f) Deleting/Clearing
Deleting a colour from the colour list can be done simply by left clicking the
colour once with the mouse then by clicking the eraser icon below the "Colour List
Box". You can also delete a highlighted item by right clicking the "Colour List
Box". To clear the entire list, click on the red 'X' icon below the list box.
If you have changed your list and haven't saved it Quick Colour Picker will ask
you if you would like to save it first. You can also cancel this incase you
pressed it by accident. The option to cancel only appears if the list has
changed.
g) Saving
To Save your list, so that you can use it later, click the icon that looks
like a floppy disk with a red arrow pointing toward it. This is located below
the "Colour List box". A save dialogue will appear. Select your directory and
filename to save the list. If the list has been altered and the exit or clear
icon is clicked you will also be asked to save your colour list. You will not
be able to save blank lists.
To export your list to an "HTML" table, an $$"Adobe Photoshop Colour Swatch" file, or an
$$"Adobe Photoshop Colour Table file", follow the saving steps above. When
the save dialogue appears, change the "Save As Type" to the appropriate file
type using the drop down box. The two Adobe file formats are the best way to
export your colours to Photoshop. Make sure you save your file using the
correct file name extension or you may over write your colour data file.
Note: Quick Colour Picker will not import colour data
from HTML tables, or Colour Table files.